Why Universal CDP for physical machines
Universal CDP allows you to replicate any Windows and Linux machine continuously to VMware vSphere where they land as regular VMs. This means these could be machines running on an unsupported hypervisor, a public cloud hyperscaler or just a physical server that runs some important application and you’d like to have a standby replica just in case. Universal CDP does exactly that, it allows you to have a near-zero RPO for these machines to a VMware vSphere or Cloud Director platform running at the DR site or a Service Provider. Once disaster strikes, you can failover to the virtual variant of that machine and continue working; or you could even use it as a migration tool to onboard customers and their machines to your IaaS platform.
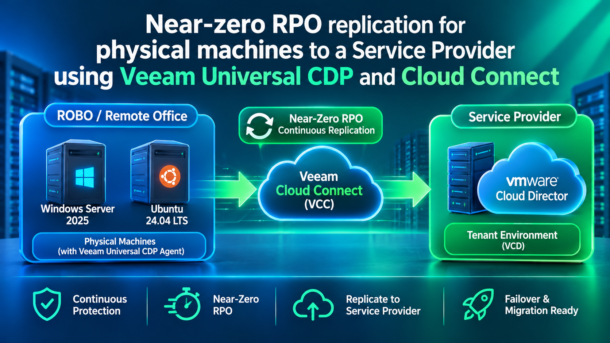
For this post, I’ve set up my lab with a simulated remote office (ROBO) that replicates two machines, one Windows Server 2025 and one Ubuntu 24.04 LTS, to a tenant in a service provider’s VMware Cloud Director (VCD) environment over Veeam Cloud Connect (VCC).
In my lab the ROBO is itself a VCD tenant, so the “physical” machines are in fact VMs, but the CDP agent treats them the same way.
The service provider environment prep is covered in an earlier post. Failover, failback and restore options follow in a future one.
Lab overview
To get this going into an existing on-premises environment with VBR and a service provider environment running VCC and vSphere or VCD, you just need CDP Proxies. At least one at each side and you’re good to go.
The architecture is well described in the official Veeam Help Center and also has diagrams for the different scenarios:
- Universal CDP between data centers.
- Universal CDP between a remote site and a service provider site
Basically the CDP agent on each source machine sends changed I/O to the local CDP proxy. Then that CDP proxy forwards it to the service provider’s CDP proxy, directly if between data centers or through the Cloud Connect gateways if across the public internet, and the replica VM is created at the DR site.
In my lab I ran this with the following setup:
| Component | Details |
|---|---|
| ROBO Backup Server and CDP proxy (all-in-one machine) | Veeam Backup & Replication 13.1.1.18 4 vCPU, 16 GB RAM |
| Source Windows machine | Windows Server 2025 Standard |
| Source Linux machine | Ubuntu Server 24.04 LTS |
| Target service provider CDP proxy | Windows Server 2022 4 vCPU, 8 GB RAM |
| Target service provider platform | VMware Cloud Director 10.6.1 (build 25086345) VMware ESXi 8.0.3 (build 25595708) Veeam Backup & Replication 13.1.1.18 with Cloud Connect |
Sizing recommendations to get started
Before building anything, size the servers properly, otherwise it’s possible that you will run into errors. These are minimums to get started plus the recommendation for production CDP proxies. For example, when I ran the ROBO Backup Server with just 8 GB RAM, CDP would not run and threw errors. The Veeam Help Center clearly states 16 GB RAM is the minimum for CDP so follow these guidelines.
| Component | Platform | Minimum to get started | Recommended for production |
|---|---|---|---|
| Source VBR server | Windows | 16 GB RAM | See BP link below |
| Source CDP proxy | Windows or Linux | 4 CPU, 8 GB RAM | 8 CPU, 16 GB RAM |
| Target cloud gateway | Windows | 4 CPU, 8 GB RAM | 4 CPU, 8 GB RAM |
| Target CDP proxy | Windows or Linux | 4 CPU, 8 GB RAM | 8 CPU, 16 GB RAM |
For the latest recommended sizing, check the official best practices guide.
Preparing the Remote site
To get started, we need to create the following
- Source VMs
- CDP Proxy
- Protection Group that holds the machines and deploys the CDP agent on them
- Important to note is that while you can mix Windows and Linux in the same Protection Group, a CDP Policy can’t mix platforms so either create separate groups or use exclusions.
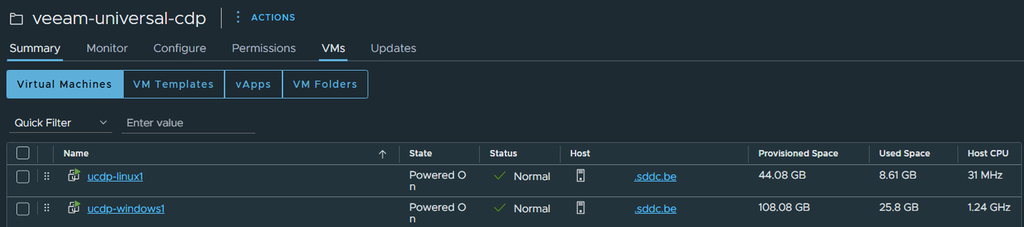
A vSphere folder with both source VMs in it.
Creating the Protection Group
Creating the protection group is a fairly straightforward process, therefore I will just provide the links to the Veeam Help Center:
- Creating Protection Groups in the VBR Web UI or Console
The Web UI in version 13.1.1.18 has no option for the CDP agent in the wizard yet. I finished the group with Install backup agent unchecked, then edited the group in the Windows Console. Its Options tab offers Install CDP agent (enables replication).
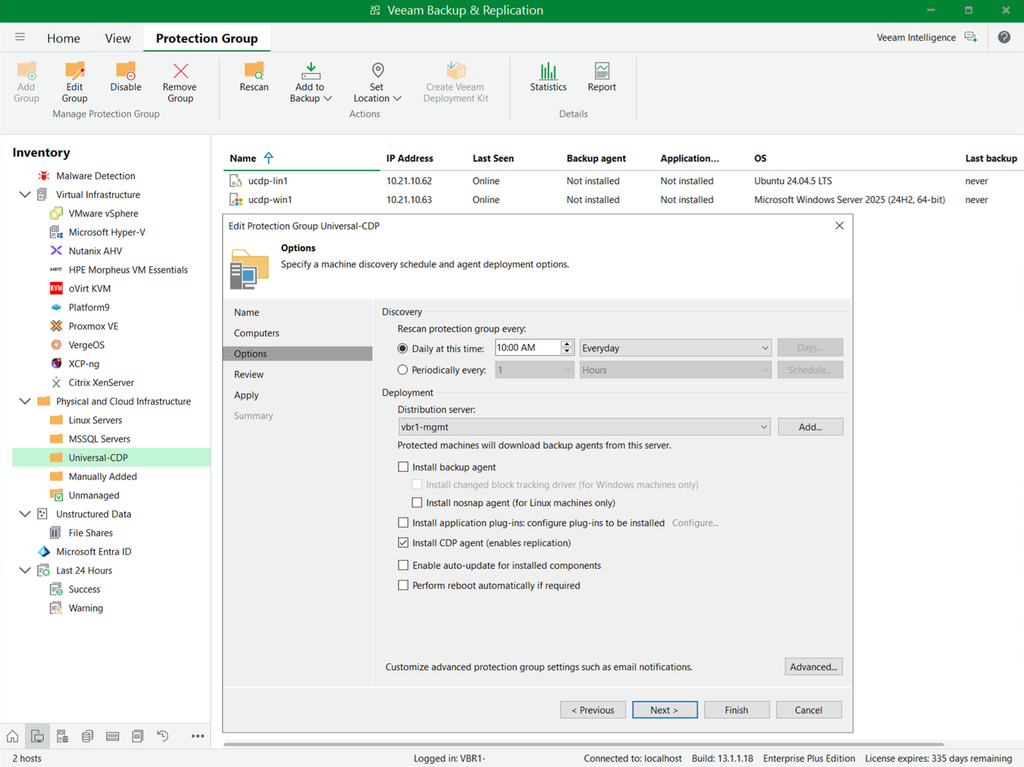
VBR Console Options tab with Install CDP agent
Once we hit Finish, it does a Rescan that installs the CDP filter driver and agent: two .deb packages on Linux, two .msi packages on Windows.
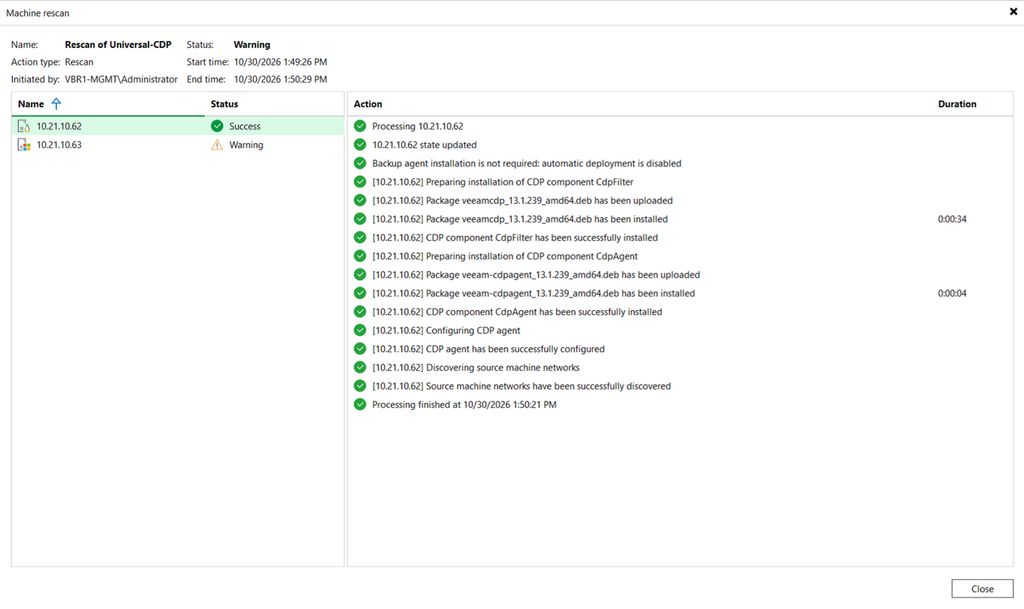
Rescan log for the Linux machine
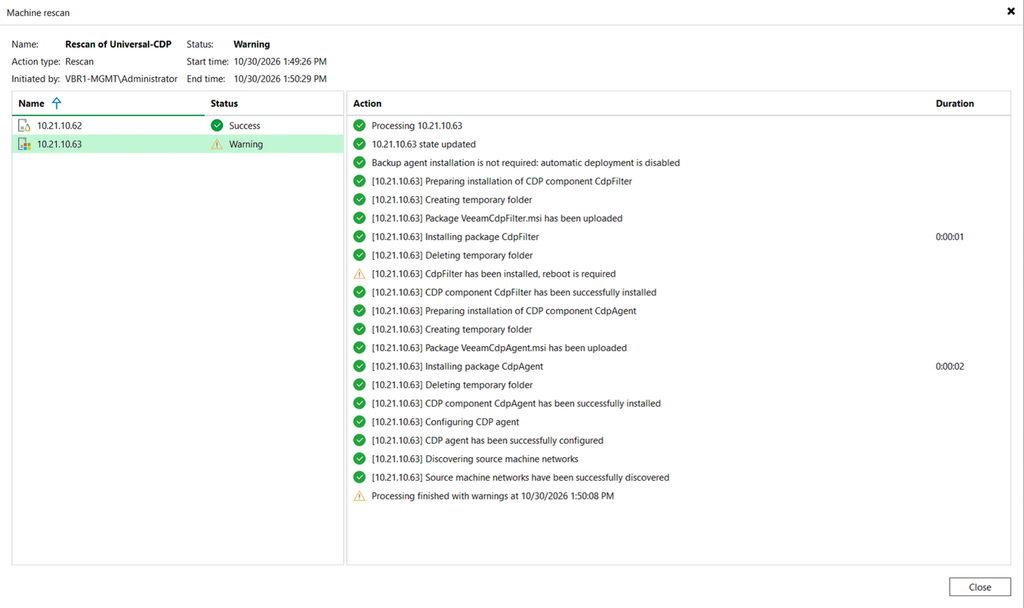
Rescan log, Windows reboot warning
As you can see, I only had to reboot the Windows machine and after doing a reboot and rescan, everything was fine. There is an option Perform reboot automatically if required, but I left it off to control everything manually.
Note that if you also back up the same Linux machine with a Veeam backup agent, the CDP volume filter driver on Linux is only compatible with the nosnap backup agent. See the User Guide. It does not apply here, because this lab has no backup agent installed.
Preparing the Service provider site
The service provider needs a CDP proxy, the I/O filter on the target Org VDC, and a replication resource on the tenant. The earlier post covers the full Cloud Connect and vSphere prep, so this section lists only the CDP-specific steps.
CDP proxy
In the Cloud Connect VBR go to Backup Infrastructure -> Backup Proxies -> Add -> CDP proxy.
Check the full wizard in the Veeam Help Center.
I reused the existing Cloud Connect VMware proxy (vcc-proxy1) and added the CDP role to it. The same server now appears twice in the proxy list, once as VMware and once for CDP. The wizard installs the CDP service when you apply.
- Ports: the defaults are 33032 (CDP host traffic, from the source infrastructure to the CDP proxy) and 33033 (between the source and target CDP proxy). In our case, with Cloud Connect in between, the source CDP proxy talks to the Cloud Gateway and that Cloud Gateway will use port 33033 to talk to the target CDP proxy. The full list is on the official Ports page.
- Cache: I kept the default 10 GB on the system drive. The cache is only used when RAM runs out, so size CPU and RAM for the expected I/O first. A dedicated fast disk is the better choice here.
- Sizing: the original proxy had 1 vCPU and 4 GB RAM, well under the sizing minimums above. I shut it down, resized it to 4 vCPU and 8 GB RAM, which is the minimum and below the 8 vCPU and 16 GB RAM recommended for production, and powered it on again.

Proxy list with the VMware and CDP roles added
I/O filter on the Org VDC
In the Cloud Connect VBR, right-click the VMware Cloud Director server under Managed Servers and choose Manage I/O filters. The wizard will list every Org VDC with its organization and filter status. Now we’ll select the VDC that should receive our CDP replicas and hit Apply.
Installing the filter on the vSphere cluster alone is not enough when you run VCD, as the User Guide explains.
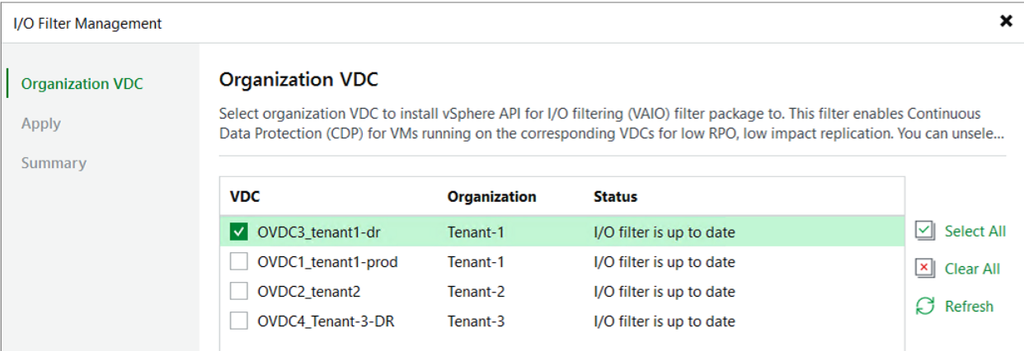
Target DR VDC selected
Once we hit apply it will go ahead and enable the I/O filter driver for our selected Organization VDC. At the Summary page we can see it’s been successfully installed, awesome!
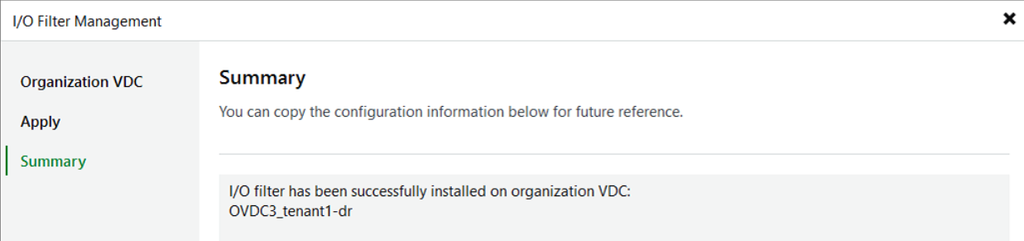
Apply Summary
Storage policy
We are almost there! What you perhaps don’t immediately see or notice is that Veeam creates a storage policy called Veeam CDP Replication. If you forget about this and you go create the CDP policy now, you’ll see that you cannot specify any storage policy, because it hasn’t been made available yet to the tenant.
Add it to the provider VDC first.
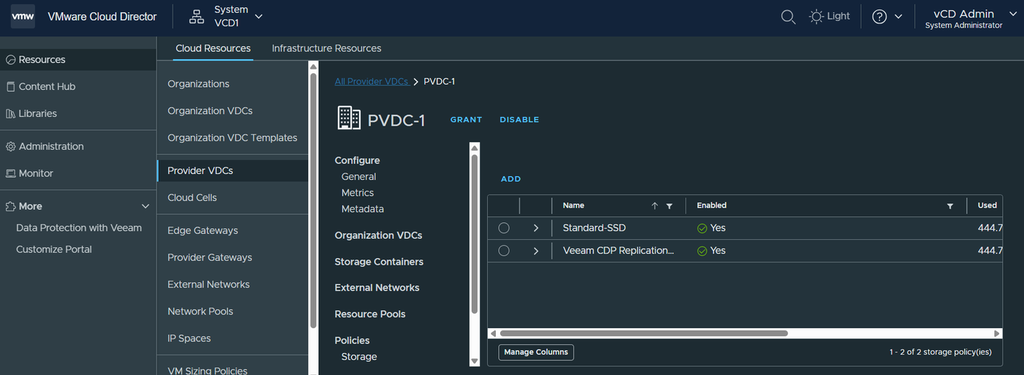
Provider VDC storage policies
Then add it to the Org VDC.
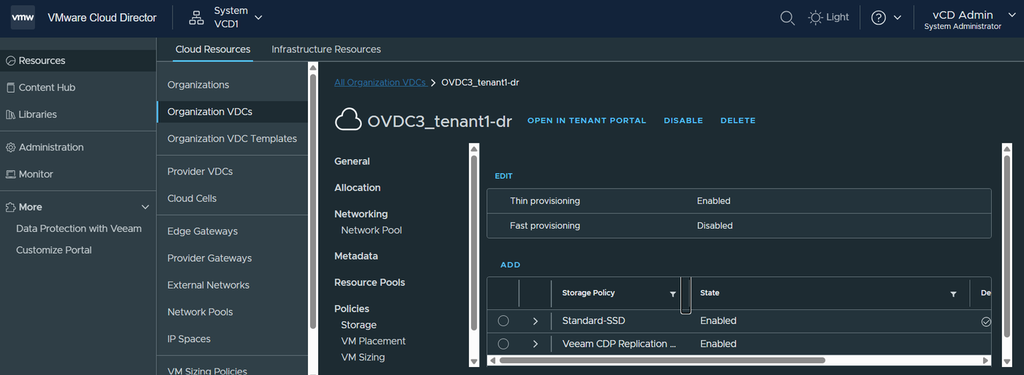
Org VDC storage policies
After that do the following steps:
- Rescan the VCD infrastructure on the Cloud Connect server
- Rescan the service provider on the ROBO VBR.
After this we’re good to go and set up the ROBO site.
Updating the Cloud Connect Tenant configuration
As a final step, we must now map the provisioned VCD resources to our Cloud Connect Tenant via Veeam Service Provider Console.
In VSPC, go to Configuration -> Catalog -> Veeam Cloud Connect -> Tenants and create or edit an existing Tenant. Note that this Tenant must be of the Cloud Director type, not Native type.
In my lab, I already had an existing one so I edited that one. Under Services turn on Replication resources and add the DR VDC under Virtual data center.
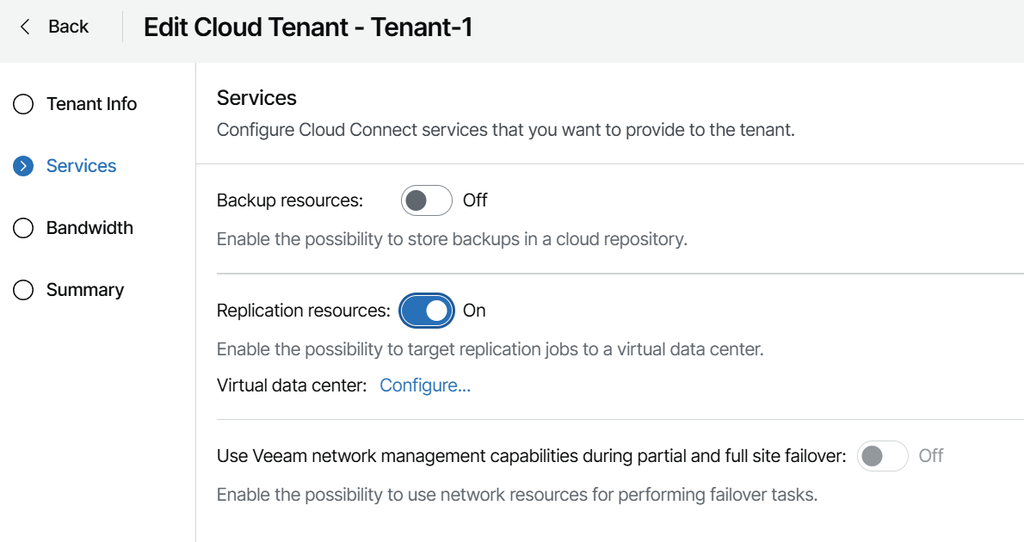
Tenant Services tab
Once enabled, hit the Configure… next to Virtual data center and pick the one to be used.
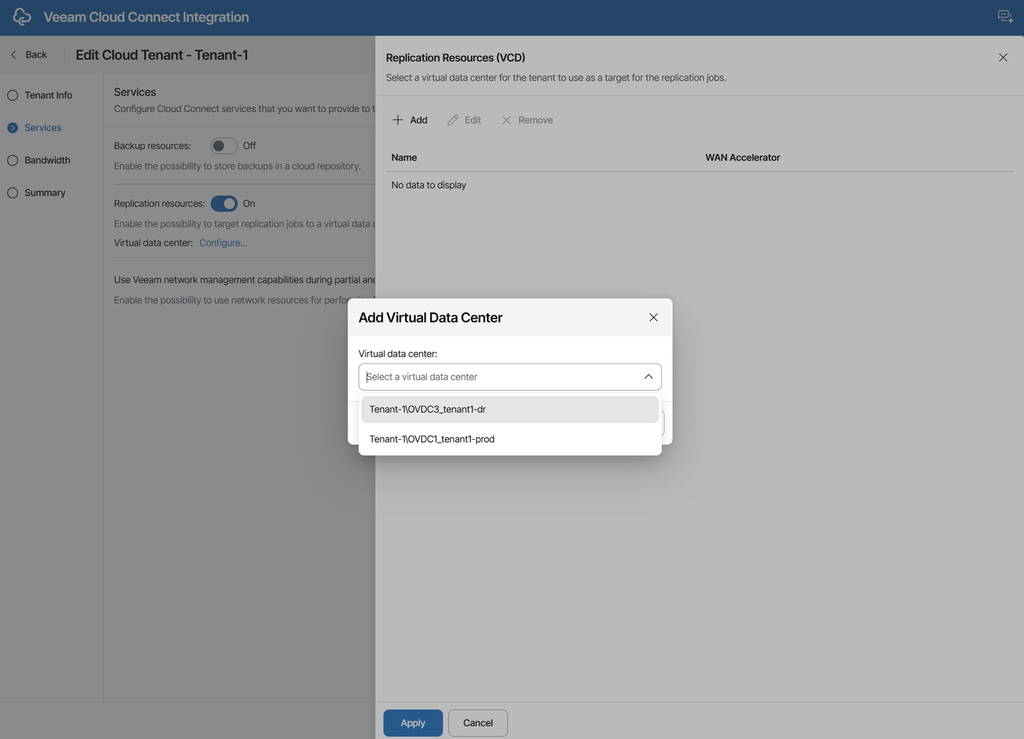
Add Virtual Data Center
Once that’s selected, hit Apply and we’ll return to the same screen where we can now see resources are enabled and VDC is provided. Finish the wizard, we’re done here!
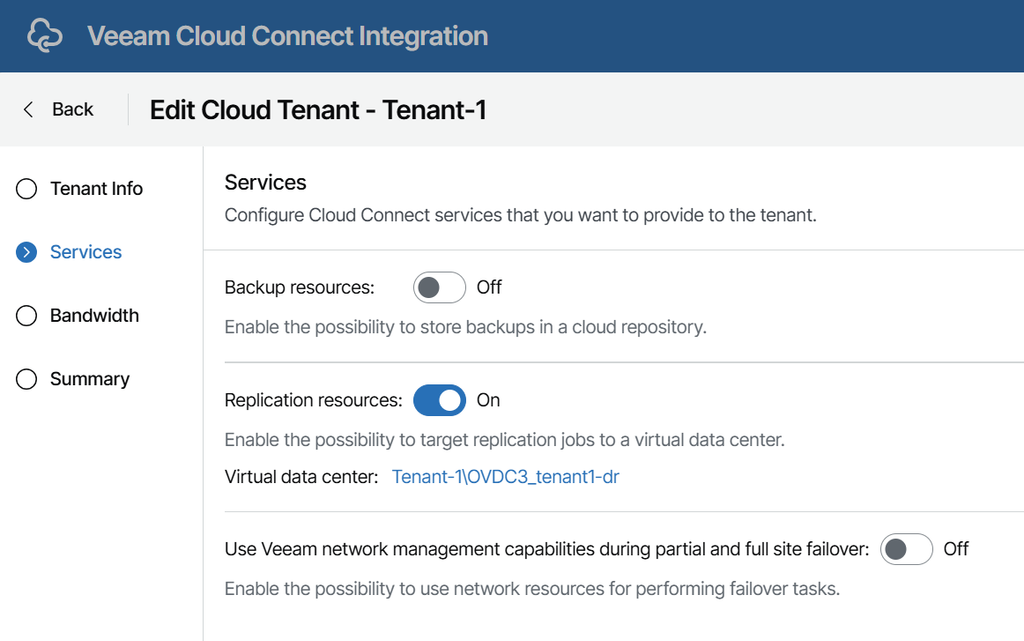
Virtual data center to the Cloud Tenant is added
One last thing to not forget about is the need for a User that will authenticate with the Org VDC. When we’ll go to the ROBO Backup Server, we’ll need to enter credentials. Therefore, make sure to create a dedicated account for this under the Org VDC -> Administration -> Users. In my lab, I just used the Org Admin for convenience.
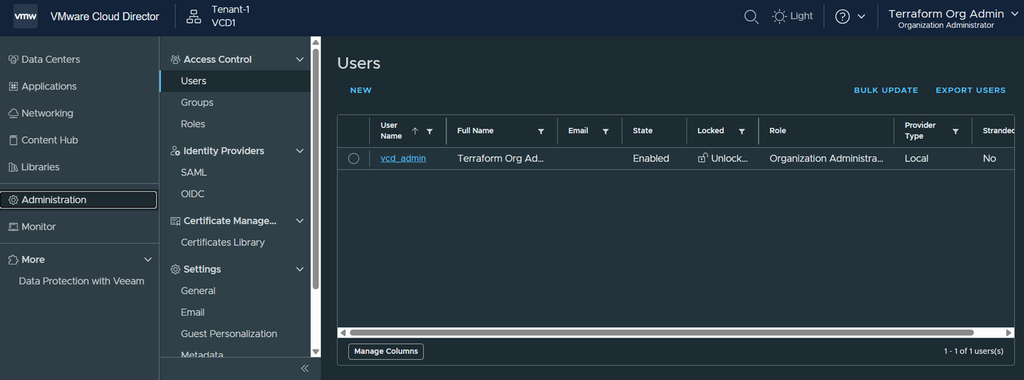
VCD users
Connecting the ROBO Backup Server to the service provider
Finally, we can go make the connection between the VBR server and our Cloud Connect target. In case you already use one for Cloud Connect Backup, you will need to add a second one, because the authentication and account is different.
In the console go to Backup Infrastructure -> Service Providers -> Add Provider, and add the same provider again. I used the descriptions MSP-BaaS and MSP-DRaaS to tell the two entries apart. For the full wizard, check out the official Veeam Help Center.
The credentials need the organization in front of the user name: OrgName\username, for example Tenant-1\user. Without it Veeam cannot tell which organization the user belongs to.
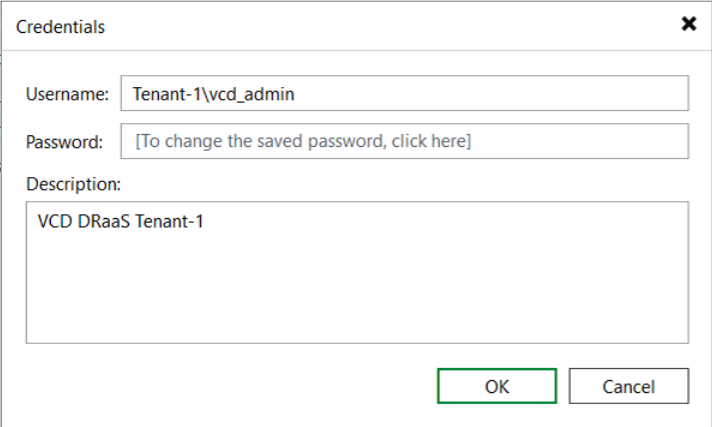
Credentials dialog
After you hit OK to save the Credentials, click Next, the wizard lists the replica resources the service provider assigned. The DR VDC shows up labelled CDP compatible. This works the same for VMs and physical machines.
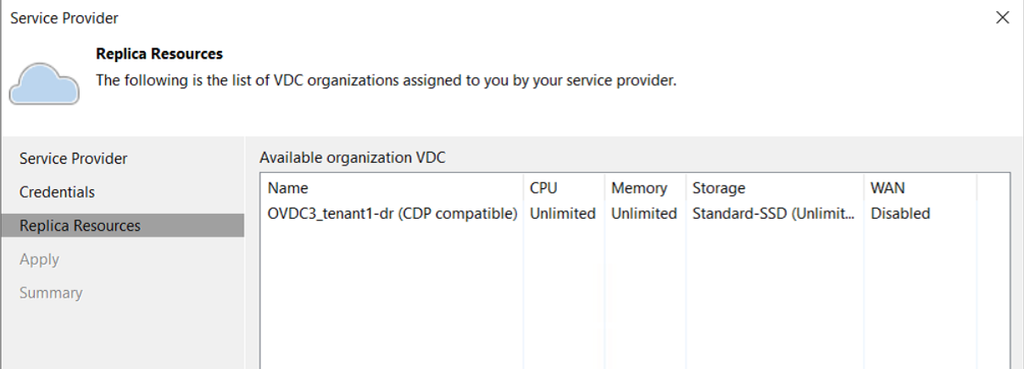
Replica Resources, CDP compatible
When we finalize the wizard, we end up with 2 entries, one for BaaS and one for DRaaS. Excellent!
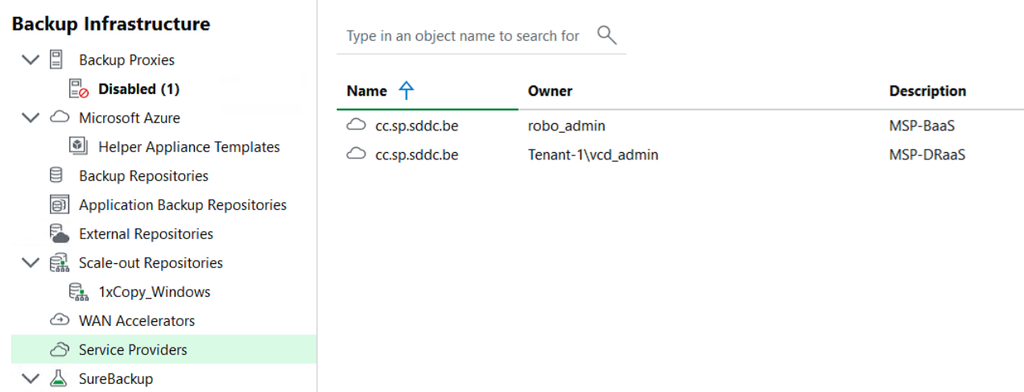
Service Providers list
Unlike a cloud repository, replica resources cannot be browsed afterwards from the Service Providers node. You only find out whether the setup works once you create a CDP policy.
Creating the CDP policy
On the ROBO Backup Server go to Home -> Jobs -> CDP policy -> Universal CDP.
If a CDP Proxy is not present at this time, the wizard will ask for it so you can set it up first and then proceed. Basically it’s similar to any other job so most of the steps you can follow with the User Guide.
Since for a Cloud Host, some items are different, I will be covering those items and screenshots here. Also remember that a CDP policy covers one operating system type, one destination and one RPO.
On the Destination Type tab, we select Cloud Host and don’t forget to select the Network remapping option as most probably the remote networks will have different names so map them accordingly.
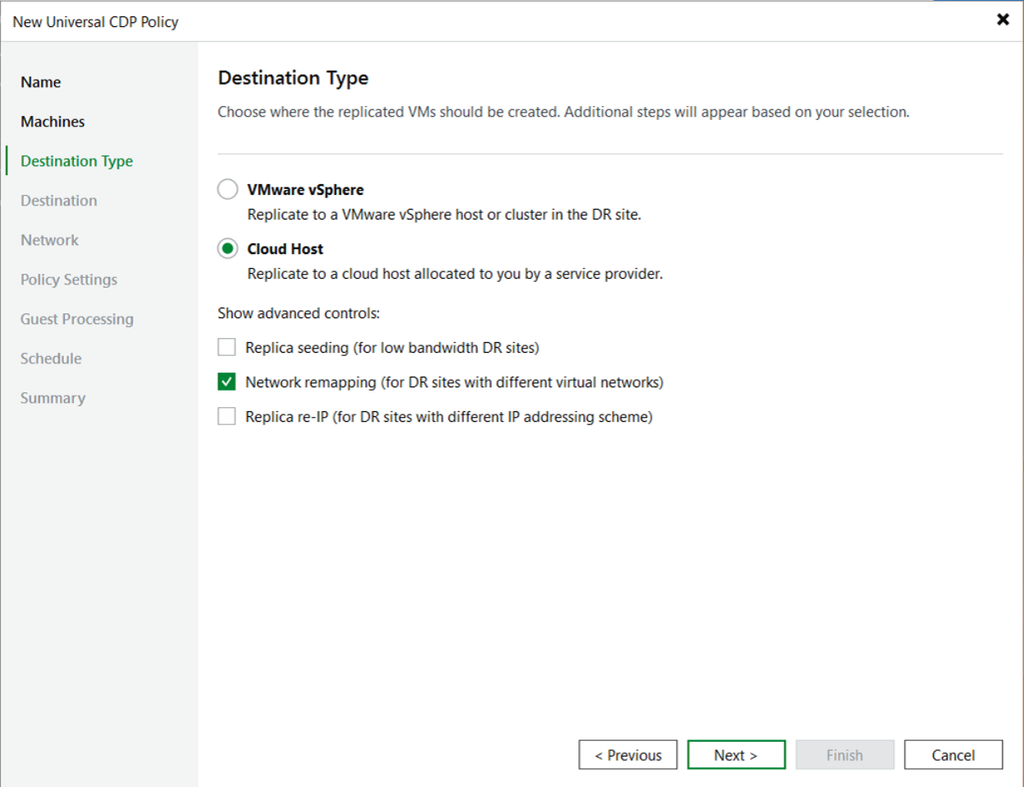
Destination Type
On the next screen we’ll hit the Choose… button and pick our Cloud Connect’s target Org VDC.
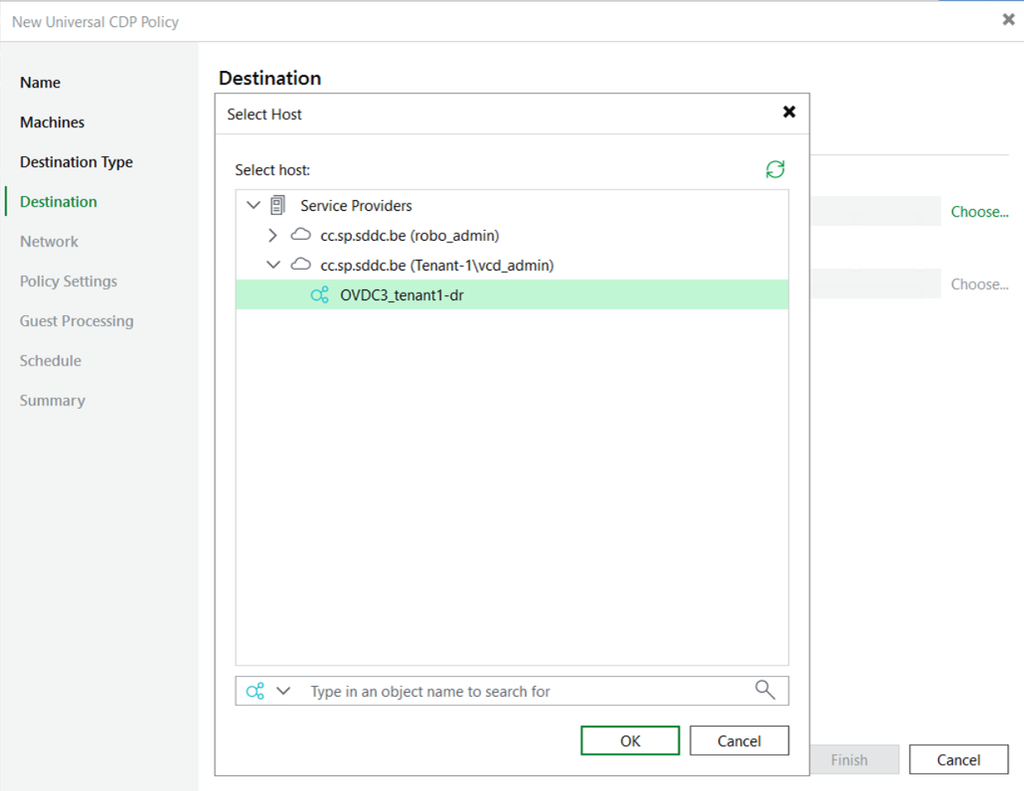
Destination: Cloud Host
Once we hit OK, we see that it will auto-populate the other fields so change those accordingly. As you can see the Storage policy also pops up here. If you did not set it earlier on, then you will not be able to continue this wizard.
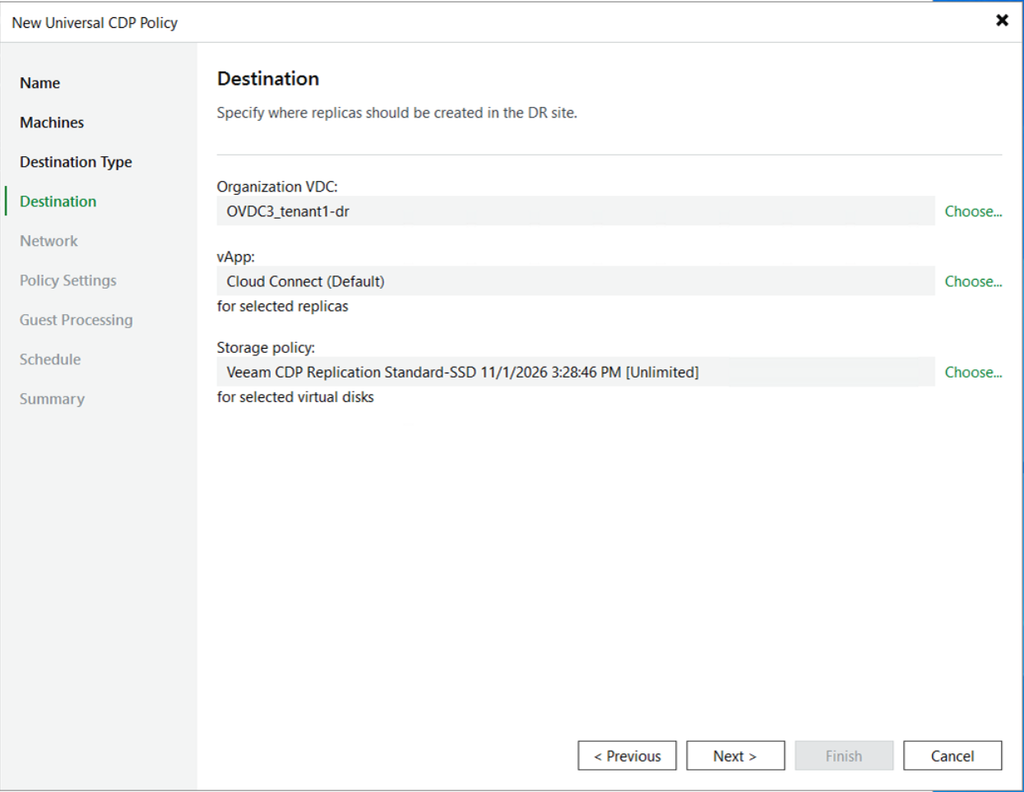
Destination: Org VDC, vApp and Storage policy
Then let’s map the networks so that the source network(s) are updated with the ones created at the target. Otherwise, you can end up with VMs being disconnected from any network and then DR will not be much of use.
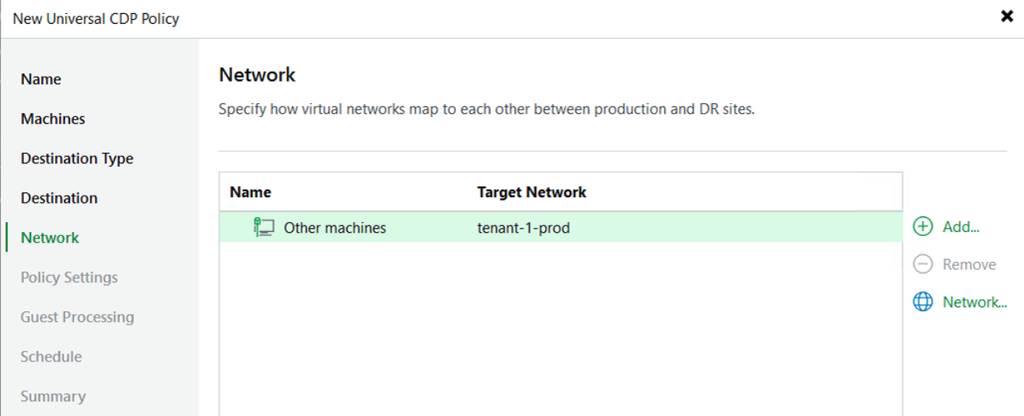
Network: Mapping source and target network(s)
Now we end up with the most important section of all actually. The Schedule and its RPO settings. There are different options that you must pick here for short-term and long-term retention.
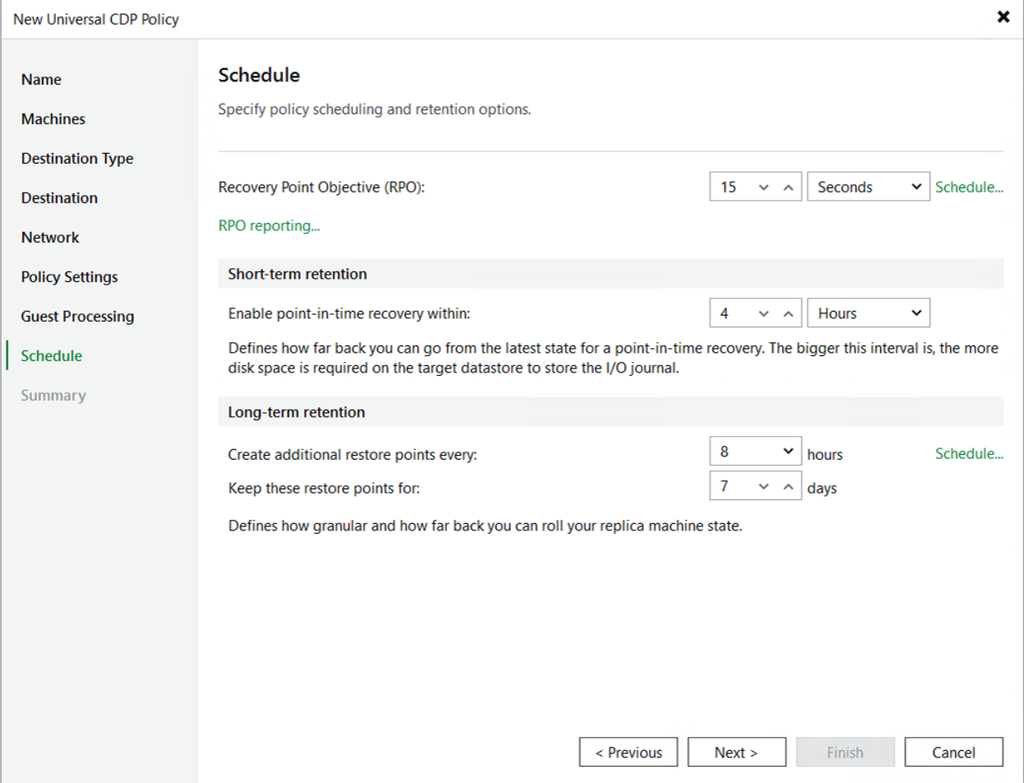
Schedule and retention
| Setting | Value |
|---|---|
| RPO | Minimum 2 seconds, maximum 60 minutes |
| Short-term retention (point-in-time recovery) | In minutes and hours |
| Long-term restore points | every X hours, kept for Y days |
From my screenshot you can tell that my RPO is 15 seconds so all data will be copied within that window. I will be able to do a point-in-time restore to every 15 seconds within the last 4 hours. Additionally, I’m creating restore points every 8 hours and keep those for 7 days.
Important to know with the RPO is that the longer you make it, the more RAM you’ll need on the CDP proxies, because this data all needs to be cached so think about this when sizing or whether it’s required to keep it so high.
On top of that, when you click Schedule… under Long-term retention, you can set whether you want crash-consistent or application-aware restore points. This gives you the choice upon DR whether you want to risk failing over to seconds ago but being unsure the application will run, or fail over to hours ago from an application consistent restore point.
Once the job is created, it will start its initial sync as in “full copy” to the DR site.
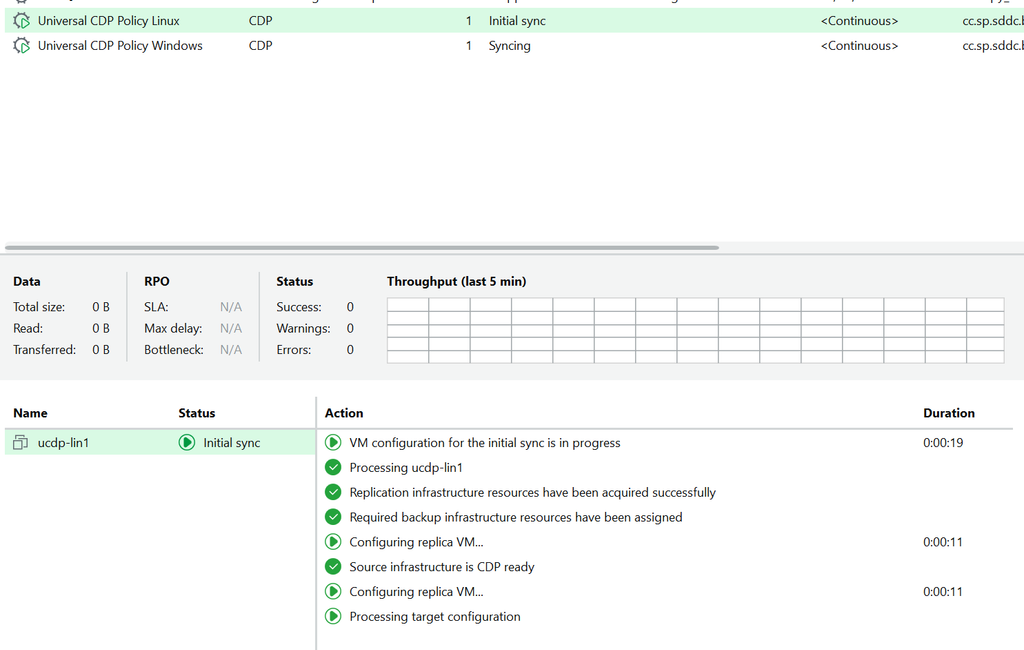
Initial sync
In vCenter a Cloud Connect folder appears with the new replica VM, powered off and named after the source (its IP address in this case) plus the _replica suffix and with a string that VCD appends.
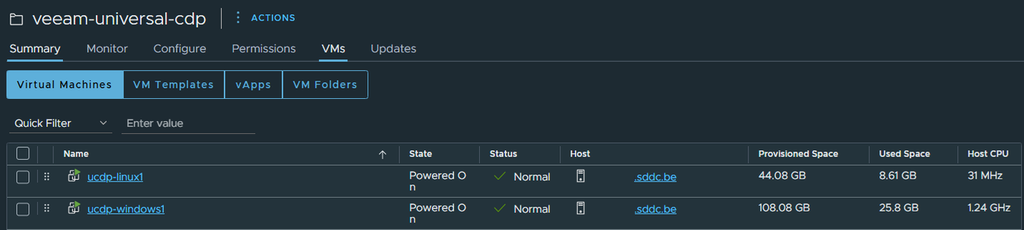
Replica VMs in the Cloud Connect folder in vCenter
On the Cloud Connect server the session shows the correct source and target CDP proxies for both disks, and data is flowing: 21 MB/s at this moment, with 2.4 GB read of the 40 GB disk.
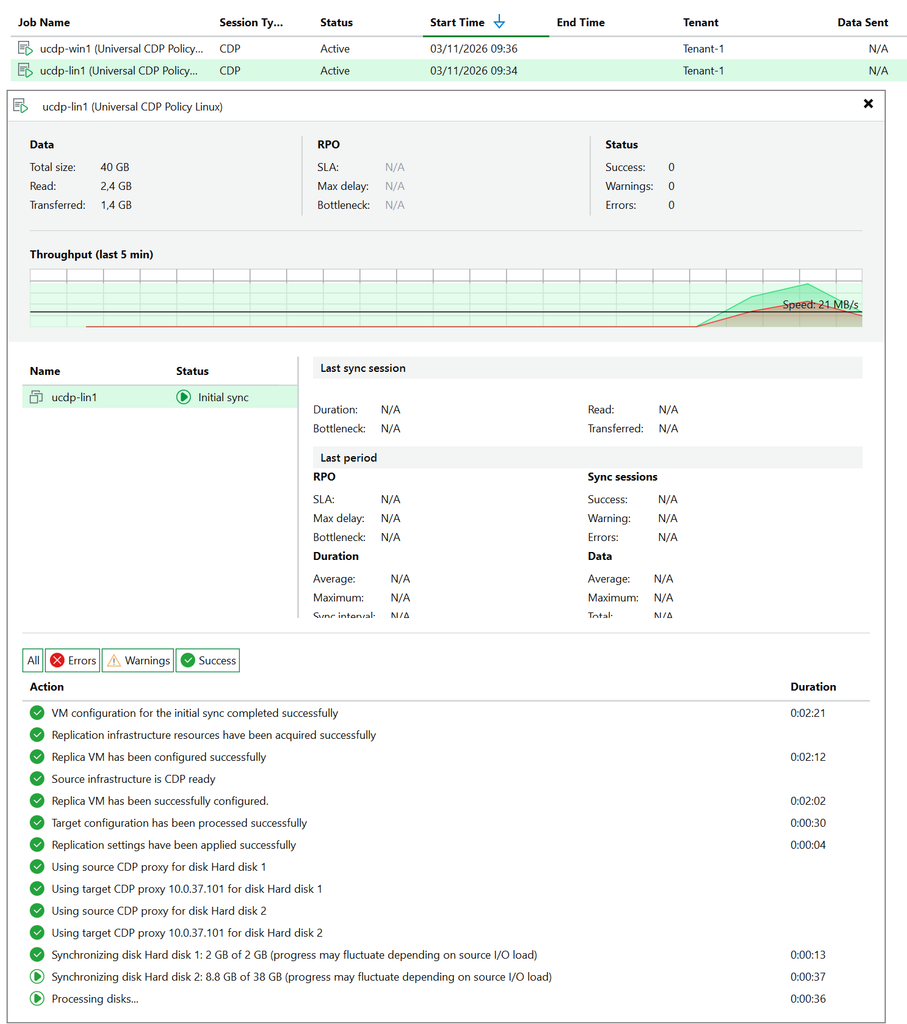
Session on the Cloud Connect server during the initial sync
Once the initial sync completes, the policy switches to CDP mode and syncs on the 15-second interval, and the first crash-consistent long-term restore point is created.

Initial sync completed, switching to CDP mode
Linux service check (optional)
The VBR console shows everything you need, but on the Linux machine you can also check the agent directly. It runs as the veeamcdpagent systemd service, so systemctl status veeamcdpagent shows its state, and you can restart it from there if needed.
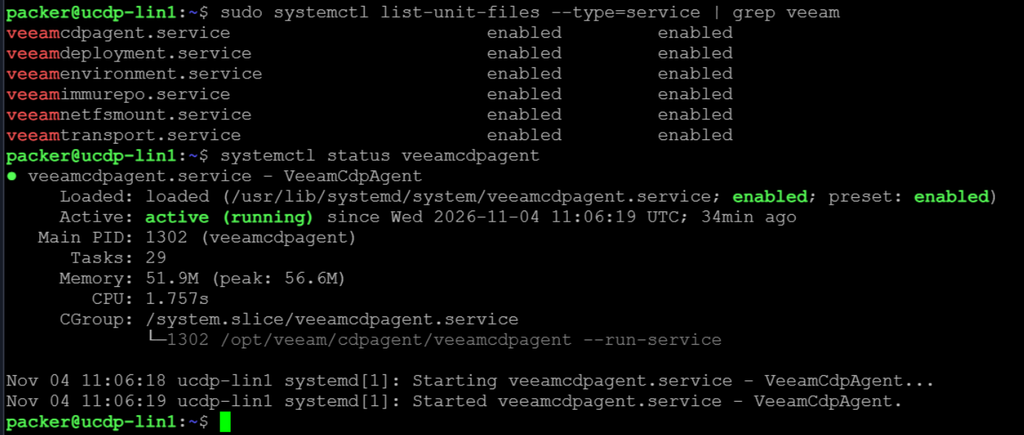
Veeam services and CDP agent status on the Linux machine
Verify the CDP Replication
In my lab it took like 10-15min for each VM to replicate and then it switched to continuous mode and started maintaining the 15 seconds RPO window.
The load on the source machines is actually pretty low and most load is noticed on the CDP proxies. I generally saw a steady load between 15% to 30%.
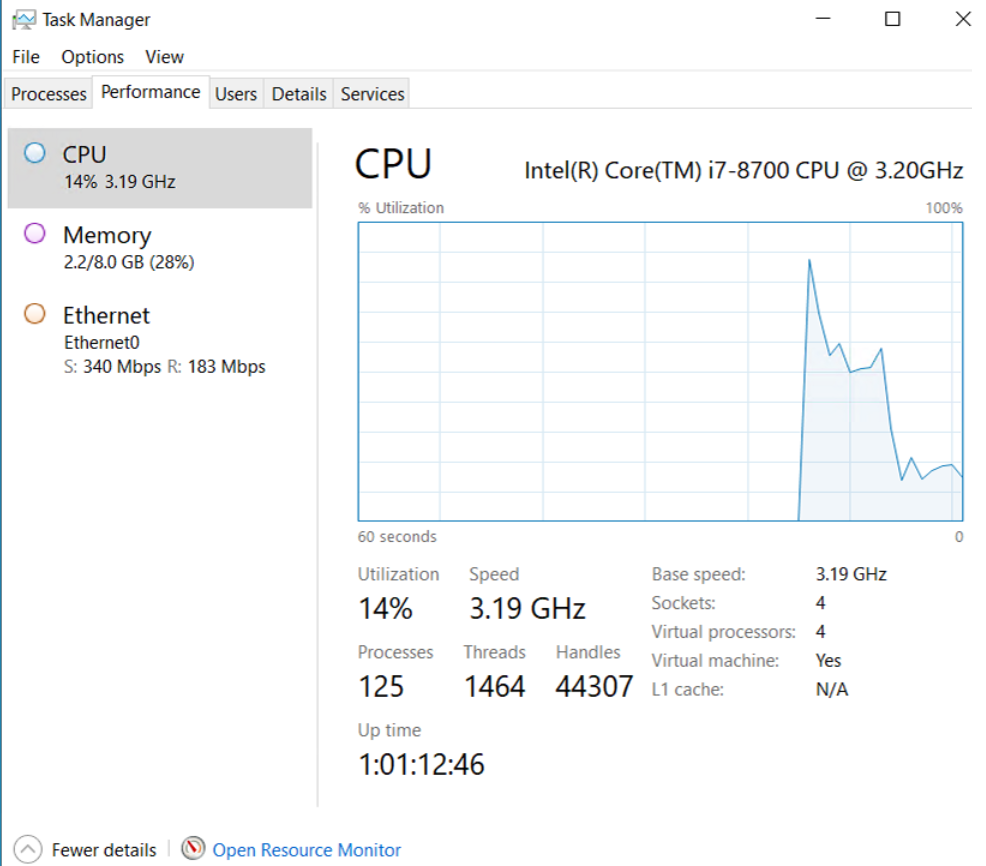
Task Manager on Cloud Connect CDP Proxy vcc-proxy1
After Initial Sync, the load was very low and the statistics aren’t showing any big numbers here. But we do see that our 15-second RPO is met 100% of the time.
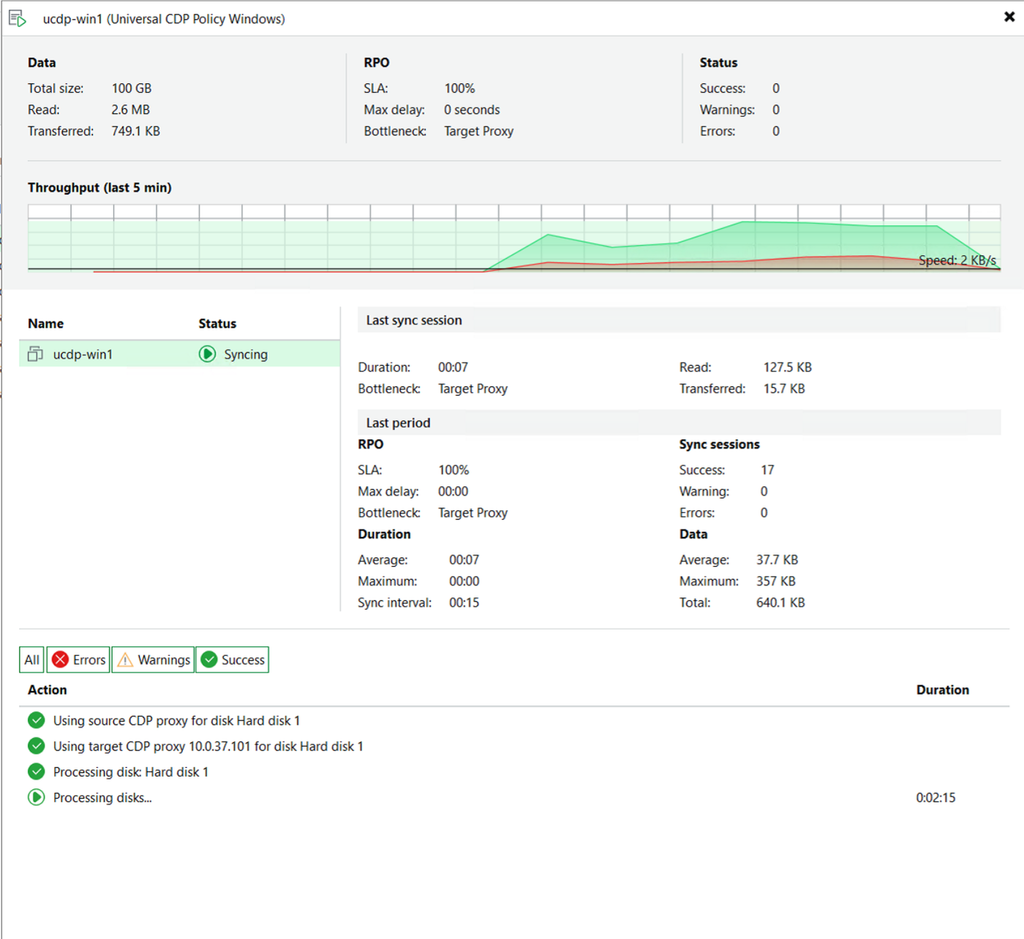
Running CDP Policy
When we run the HTML report to show proof, we can clearly see it’s all green.
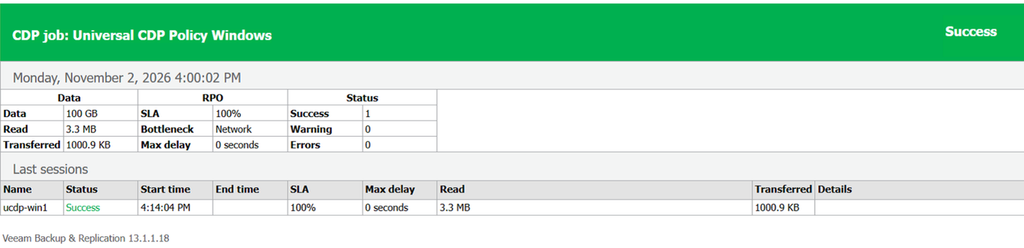
CDP Policy HTML report
Stress test
To see what happens under load, I downloaded a 2.7 GB Ubuntu ISO onto the source machine, which wrote about 30 MB/s of new data. The job logged RPO has been exceeded by more than 3 seconds. The SLA dropped to 98% and later to 92%, and the maximum delay rose from 6 to 35 seconds. The bottleneck indicator moved from Network to Target Proxy.
The cache folder on the ROBO CDP proxy stayed empty which shows RAM absorbed the burst, yet the RPO still slipped.
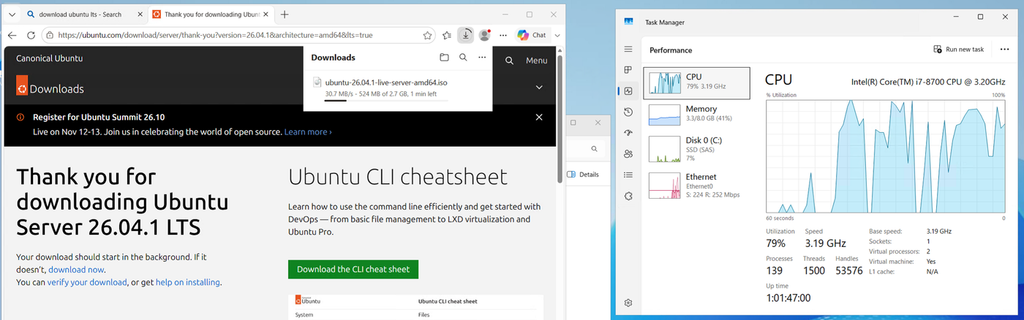
ISO download on the source
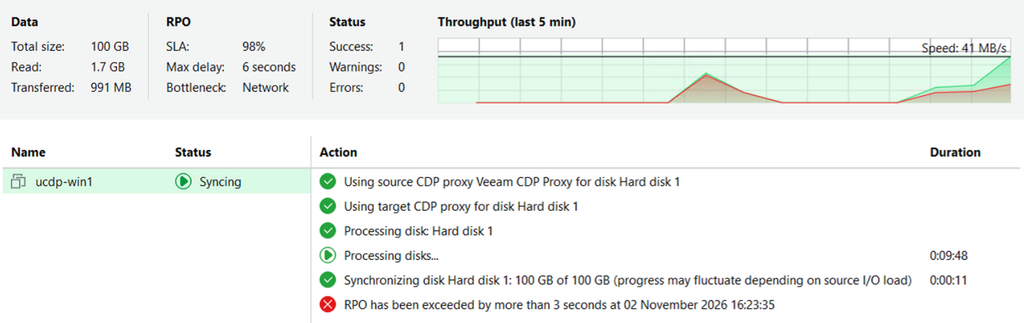
RPO exceeded, SLA at 98%
Notes for running in production
Doing this was a lot of fun, but basically when you want to take it to production, you need to keep the following items in mind.
- Dedicated proxies. Use dedicated CDP proxies at both ends, sized as in the sizing section above. A proxy shared with other workloads, like my Cloud Connect proxy, needs capacity for both.
- Cache. It’s a safety measure when RAM runs out. It was never used in my tests, but put it on a fast dedicated disk.
- Ports. Open TCP/33032, TCP/33033 and the Cloud Connect port TCP-UDP/6180 before you test. See the Ports page for full details.
- Accounts. Use certificate-based authentication through the Veeam deployment kit which avoids storing credentials on the Backup Server, and a dedicated VCD user per Tenant/Customer instead of the organization admin.
- One platform per policy. Create separate protection groups for Windows and Linux from the start.
- Reboots. Machines might need a reboot after the filter driver installs. Plan it, or enable the automatic reboot option in the protection group.
- Consistency. Application servers need application-aware processing and a schedule for when those checkpoints may run. Without it, restore points are crash-consistent which can lead to non-responsive applications or data-loss upon failover.
- RPO. A 15-second RPO is a target. Test it with a write load that matches your busiest source.
What’s next
The ROBO machines now replicate continuously into the target tenant’s DR Org VDC, each as a replica VM.

Both policies running in continuous mode
Under the restore options, we can see that Failover now… is available as well as we have the ability to restore guest files directly from the replica. Application restore only appears when application-aware processing is on, which I left off in this lab.
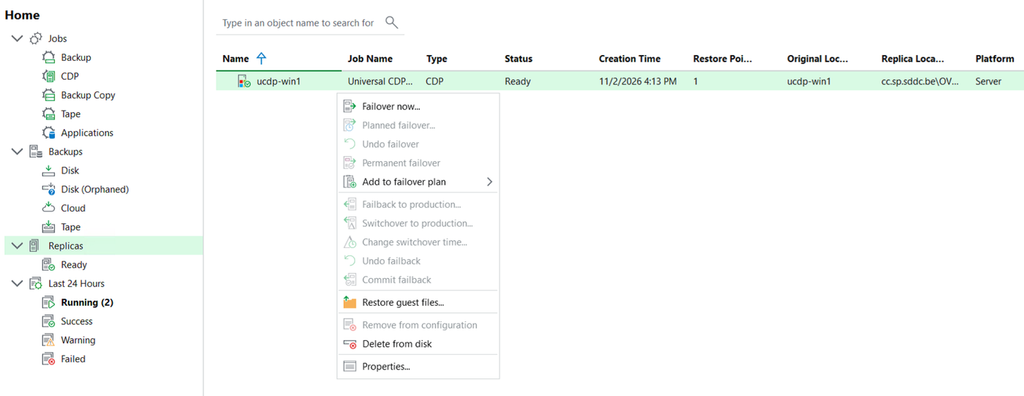
Replica recovery options: Failover, Restore guest files and more (depends on the source workload and OS type)
In a future post, I will cover the options for failover, failover plans, SureReplica and other restore options so stay tuned!
Hope this was an interesting read and thanks for reading!