Running vSphere 7U3 for a long time in the lab, I was eager to try out vSphere 8. Like many of us, I waited for the first “service pack” and once Update 1 hit the release, I went for it.
Each of my two ESXi hosts for workloads has a local Samsung EVO 970 Plus in it and finally I could convert them from local datastores into a shared datastore without cache tier now that vSphere 8 brings the VSAN ESA architecture.
1x local NVME Samsung SSD 970 EVO Plus 2 TB per ESXi host

vCenter upgrade
First of all, I upgraded my vCenter from 7U3 to 8U1 by downloading the new ISO and going through the entire upgrade wizard. Takes some time, but very straight forward and no issues here. Done!
VSAN witness upgrade
Next up is taking care of the VSAN witness since I’m running a 2-node VSAN cluster. In my lab I’ve got 2 dedicated ESXi hosts for workloads and one ESXi host for management VMs. It’s on this one I deployed the VSAN witness OVA. Yes it’s a VM, but zero issues so far!
Before proceeding with the upgrade, make sure the VSAN witness is on the same patch level, otherwise you will receive a warning when creating the VSAN disk groups. In my case, since it’s a lab, I deployed a fresh VSAN witness appliance 8.0b OVA and upgraded it to 8U1 via esxcli. I assume you can also just upgrade the existing v7 witness appliance, but I found it nice to start off fresh.
VSAN witness VM on my management ESXi host

ESXi upgrade
For now I left my management ESXi host on 7U3 just in case, but upgraded my two ESXi hosts for workloads to 8U1. No issues at all!
Network
VSAN ESA requires 25 Gbps at a minimum, which makes total sense. However since this is a lab and my ESXi hosts are connected with 10 Gbps, it should work fine for my needs.
Cluster
In my lab, I also had to convert my cluster to support vSphere Lifecycle Manager Images before I could proceed. Therefore carefully read the official vSphere 8 Upgrade Activity Path documentation!
Finally ready!
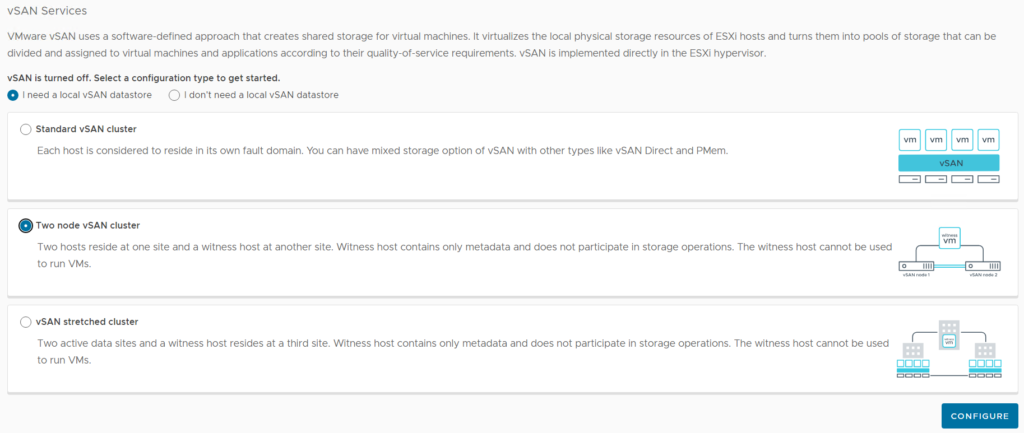
Now we can go to vCenter -> cluster -> configure -> vSAN -> Services.
I have a 2-node VSAN cluster (with a witness), therefore that’s what I’ll select.
Click Configure.
Next, the wizard pops up and the NVME device(s) are detected. This means we can enable vSAN ESA.
Looks like no issues with the NVMe devices and physical NIC link speed is fine too.
As mentioned before, I have 10 Gbps running to the ESXi hosts.
Click Next.

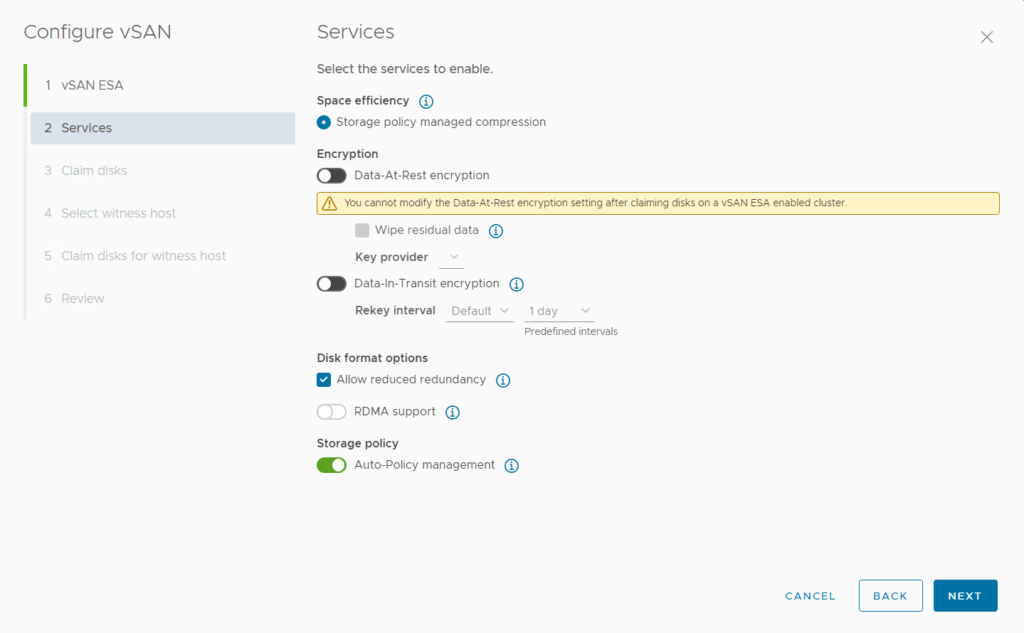
Currently VSAN ESA only supports compression, therefore we cannot select anything else.
Given the fact I have only two ESXi hosts, I will set the option to Allow reduced redundancy.
Under Storage policy, I also enable Auto-Policy management.
Click Next.
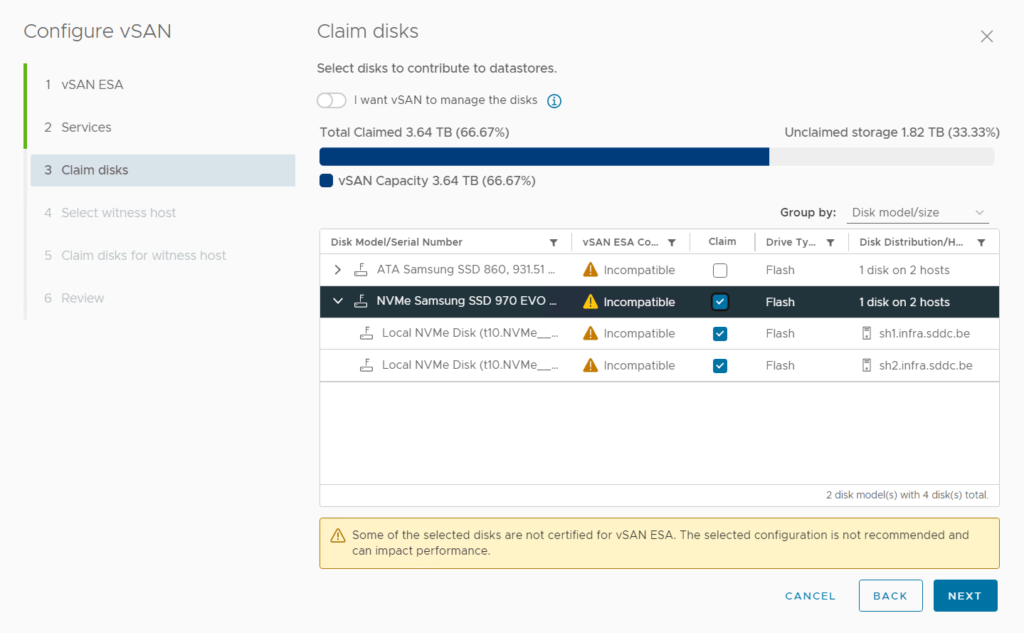
Claim disks shows all NVMe/SSD disks in my system and marks them as ESA incompatible. However, I can check the box to claim the NVMe drives and proceed.
Click Next.
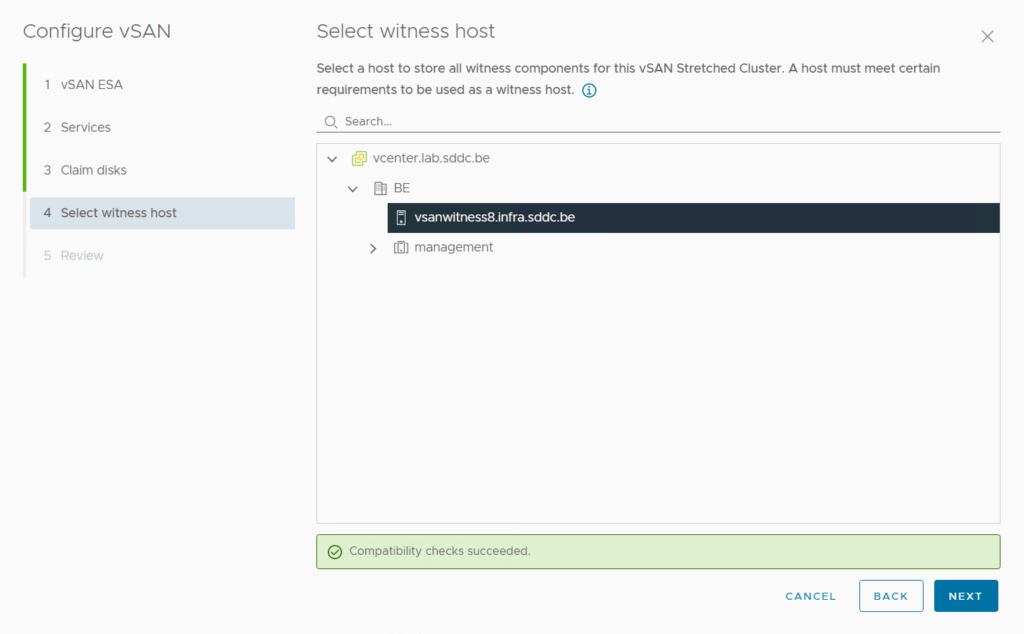
As a final step, select the witness host and we’re all set.
Click Next.
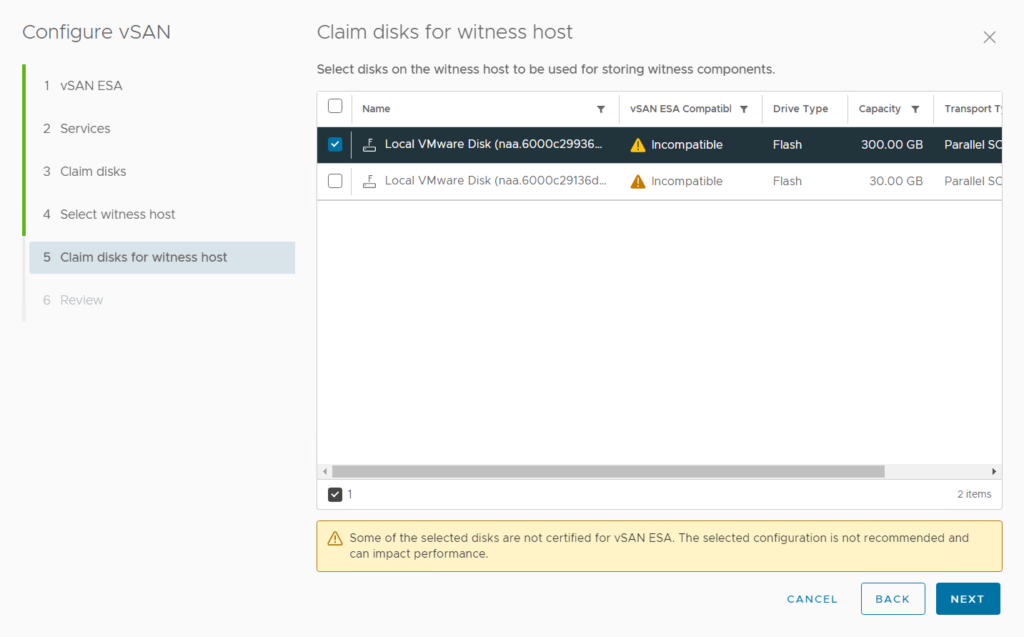
Note: In case you are using a regular nested ESXi as a witness host, you need to claim the disks for storing witness components. When using the VSAN witness OVA, this step is automatically skipped.
Claim disks for witness host shows up when not using the VSAN witness OVA.
Review all the settings and click Finish!

In the back ground things start to happen…

Now wait a couple of minutes for all tasks to finish.
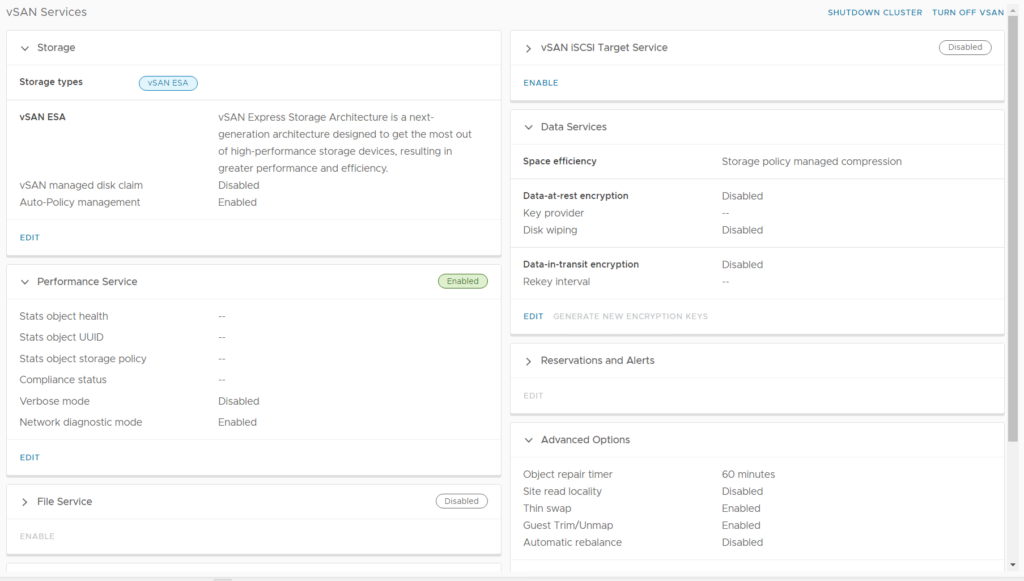
Once finished go to vCenter -> cluster -> configure -> vSAN -> Services.
On this screen it looks like everything is operational, great!
To check the VSAN datastore configuration go to vCenter -> cluster -> configure -> vSAN -> Disk Management.
Datastore management shows 1/2 disks in use which is correct in my case as I’m currently using 1 NVME in each host and a regular SATA SSD which is unclaimed at this point.

To check the Fault Domains go to vCenter -> cluster -> configure -> vSAN -> Fault Domains.
This also looks fine as both hosts show up, the witness host is set and we can tolerate 1 failure in the cluster.

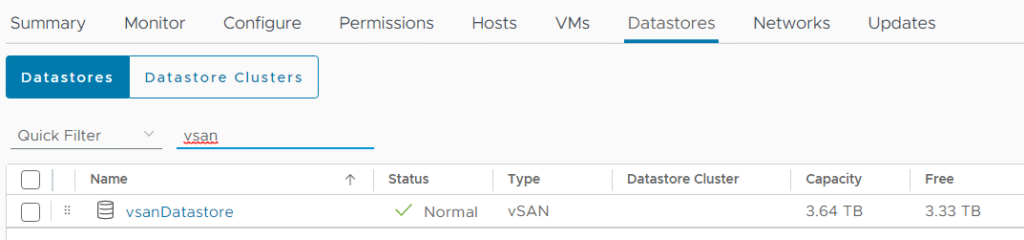
On the cluster -> Datastores, we can see the vsanDatastore has also been created.
In my case the capacity is 2x 2TB as I will have FTT=1.
Performance
To wrap up, let’s deploy a test VM and do a little performance test!
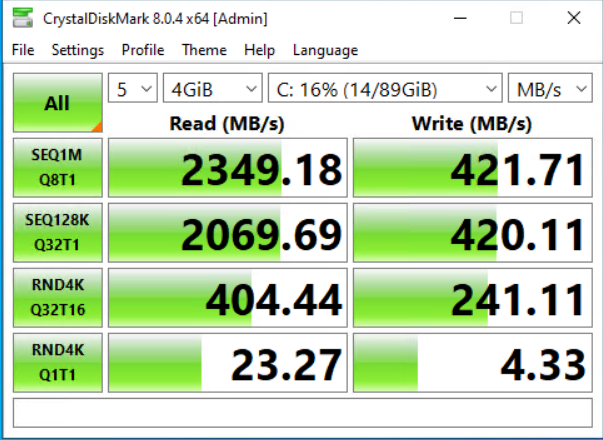
For this, I created an empty Windows Server 2022 VM and downloaded CrystalDiskMark and ATTO Disk Benchmark onto it.
Read speed looks great, Write not too much, but again this is a lab so overal it looks pretty good.
NVMe SSD profile, Read&Write+Mix.
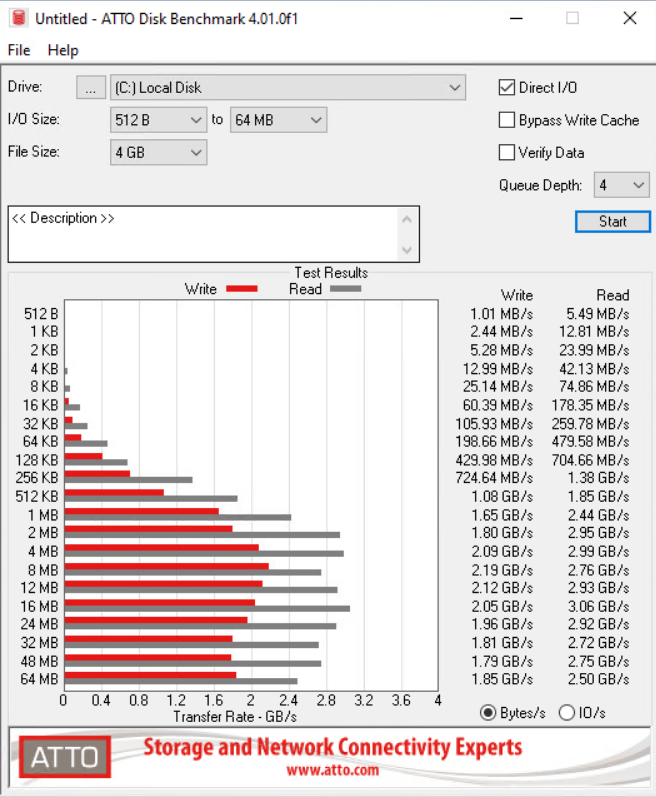
To double check, let’s check the second benchmark tool.
With all defaults, Read and Write speed look very good.
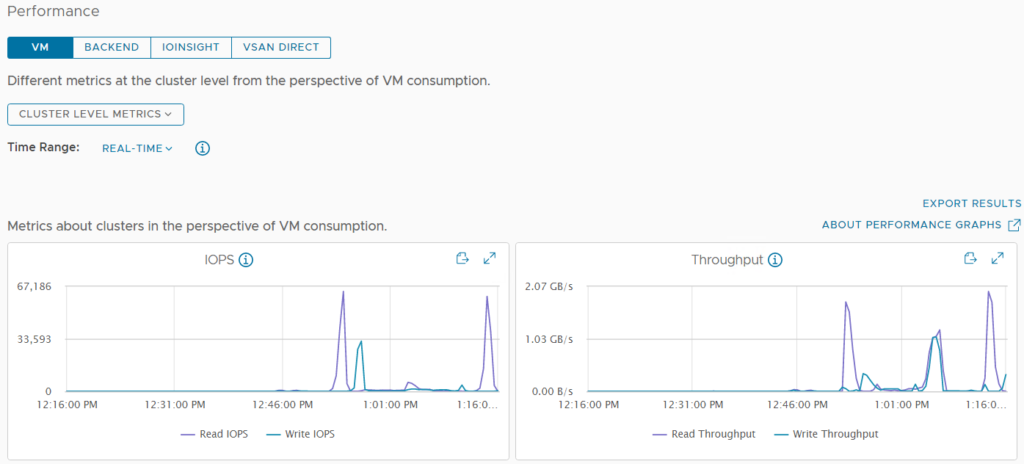
Under vCenter -> cluster -> monitor -> vSAN Performance, we can see the results of the benchmarks we ran. These confirm a decent amount of IOPS and throughput. After all this is a lab so I’m happy with the results.
Now that everything is set up properly, it’s time to move all my lab VMs to the vSAN datastore and enjoy its performance and HA in the VSAN cluster.
